Understanding how to freeze cells is essential knowledge for biomedical researchers working in drug discovery and diagnostic development.
Researchers commonly freeze primary cells and cell lines to enable flexibility in their experimental timeline and to preserve cell quality. Furthermore, a repository of frozen cells will ensure reproducible assay results and provides a source of backup cells in the case of contamination or loss of cell cultures.
The process of freezing cells is a complex phenomenon that has been studied for decades.
Since water is the most important component in living cells, cellular metabolism stops when water turns to ice. Cells resume their normal biological activity following a proper thawing procedure.
Despite the many advantages of cryopreservation, the process can be stressful for cells due to exposure to the cryoprotectant and the low temperatures required for freezing.
This article provides the best practices and tips to ensure your frozen cells maintain high viability and quality upon thawing. We’ll cover the following topics which underpin most cell freezing protocols:
1. Selecting the Right Freezing Medium
2. Cryogenic Vials and Labeling
3. Optimal Cell Freezing Rate and Long-term Storage
How to Freeze Cells: Process Overview

Selecting the Right Freezing Medium
Selecting the correct freezing medium is cell line and application dependent and will need to be optimized to ensure the highest viability post-thaw.
For most applications, you should consider using growth medium serum or commercially available freezing medium, such as dimethyl sulfoxide (DMSO).
We recommend using a reliable, general-purpose freezing medium containing DMSO such as CryoStor® CS-10. This particular cryoprotectant is serum-free and animal component-free and is commonly used for freezing lymphocytes.
Before starting your cell freezing protocol, make sure you have already prepared your freezing medium for the appropriate temperature and volume for suspending cells.
If using CryoStor® CS-10, be sure to cool the medium between 2° and 8°C. The appropriate volume will be based on your medium type and preferred cell concentration in each cryogenic vial.
For CryoStor® CS-10, your cell concentration should be between 5 million and 10 million cells per mL of medium. For example, if you had 100 million cells then you could suspend in 20 mL of freezing medium to aliquot across 10 vials (2 mL of medium per vial) at 10 million cells per vial.
Remember to pipette the medium up and down multiple times after mixing with cells to ensure a single cell suspension before moving to the freezing procedure.
Additionally, it is best not to fill the cryogenic vials to the top with the suspension because this will greatly increase your risk of contamination.
Cryogenic Vials and Labeling
Any vial used for freezing cells should be rated for cryogenic applications. These vials should be manufactured from polypropylene and withstand temperatures down to -196°C.
We recommend using externally threaded vials with a silicon ‘O’ ring to ensure a tight seal at the cap.
The main advantage of externally threaded vials (versus internally threaded vials) is that the risk of contamination is lower since nothing gets inserted into the vial. In addition, the cap on externally threaded vials features a long skirt for easy one-handed aseptic technique when closing the vial.
Label your vials with polyester cryogenic vials with an adhesive that can tolerate ultra-low temperatures. Consider using Brady B-492 Freezerbondz or a similar type label.
Print all important information on your label such as date, cell type, identification number, and concentration before adhering to the vial.
Optimal Cell Freezing Rate and Long-term Storage
Once the cells are aliquoted into appropriately labeled cryogenic vials, you can begin the freezing protocol. Unlike thawing cells, the freezing process is a slow, controlled process.
It’s vital to give the cryoprotectant time to remove water from the cells which reduce the risk of damage due to ice crystal formation.
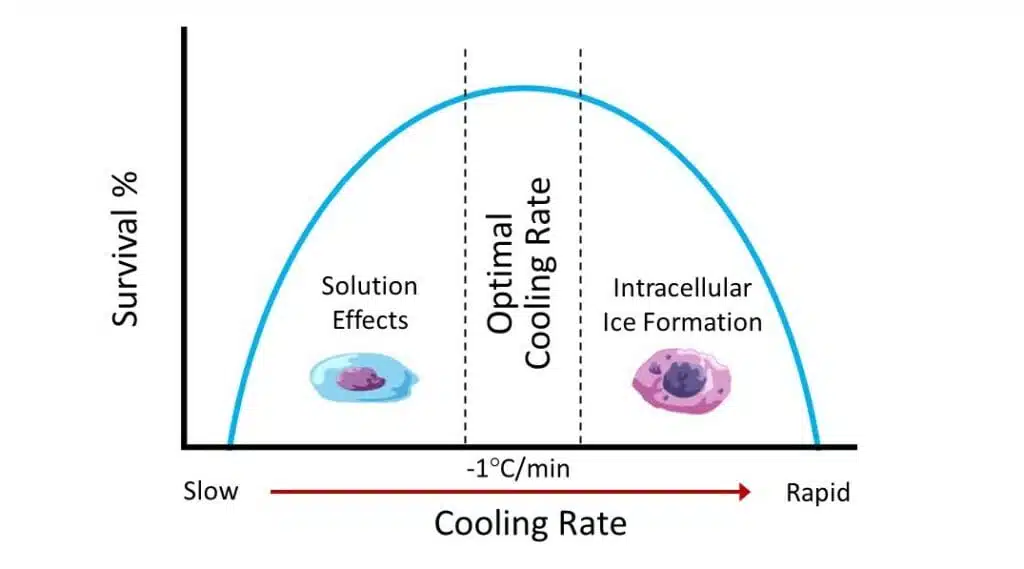
When cells are frozen rapidly, water and ions tend to remain in the cell. This minimizes solute concentration effects and dehydration.
However, intracellular ice formation will cause significant damage by tearing and piercing the cell membrane.
Conversely, if cells are frozen slowly, water outside the cell freezes before intracellular ice forms. This allows water to escape by osmosis but increases the concentration of intracellular solutes which can be toxic.
In effect, very fast and very slow freezing rates have consequences either by excess ice formation or increased solute toxicity.
Cryoprotectants such as DMSO encourage dehydration, minimize ice crystallization, and reduce solute effects.
For most cells, the optimal rate of freezing is between 1°C per minute.
As you can see in the diagram shown, at this temperature range the negative impact the intracellular ice formation is at equilibrium with increased solute concentration.
This will result in maximum cell viability.

Freezing cells is typically a two-step process in which cells are cooled at a slow, controlled rate to -80°C before being stored long-term at -135°C or less.
Step 1: Freezing Cells at a Controlled Rate to -80°C
As previously stated, cells must be cooled at a rate of about -1°C per minute to -80°C with the use of a controlled rate freezer or controlled rate container.
Most research labs use specialized containers such as the Mr. Frosty™ Freezing Container to control the rate of freeze. These containers are an easy-to-use and low-cost alternative to controlled rate freezing instruments.
Once the cryogenic vials are placed in the container, they can be placed in a -80°C freezer overnight. After 12 hours, the cryogenic vials are ready to be transferred to a liquid nitrogen freezer for long-term storage.
It’s worth noting that you should avoid storing cells in the -80°C freezer for more than two weeks. Longer storage periods at this temperature will result in cell death and low sample viability.
Step 2: Long-term Storage in Liquid Nitrogen
There are two basic types of liquid nitrogen storage practices. One is immersing the vials directly in the liquid. The other involves holding the vials in a vapor phase above the liquid.
Vapor phase systems create a vertical temperature gradient within the container. At the bottom, the liquid nitrogen will maintain a temperature of around -196°C.
The temperature in the vapor phase increases as it reaches the top portion of the container. Enough liquid nitrogen should be used to ensure the warmest part at the top of the tank is always colder than -135°C.
We recommended storing vials in the vapor phase rather than the liquid phase. Metabolic activity is arrested at -135°C and the additional cold temperatures of the liquid phase offer no real advantage.
In fact, immersing vials in the liquid phase runs the risk that some of the liquid nitrogen could penetrate and damage the vials.
Conclusion
Learning how to freeze cells with maximum post-thaw viability is an important skill for researchers and laboratory staff working in immunology, toxicology, and other scientific fields.
To recap, there are three main considerations when developing a cell freezing protocol: freezing medium type and concentration, type of cryogenic vials, and optimal freezing rate, and long-term storage temperature.
It is best to use a freezing medium containing a cryoprotectant such as DMSO to freeze down healthy and viable cells.
The freeze medium cell concentration will be cell and application dependent and therefore optimization is necessary for long-term storage.
Cryogenic vials should be externally threaded and rated for -196°C.
When freezing cells, ensure a controlled cooling rate of -1°C/min until -80°C is reached, then transfer to vapor phase of a liquid nitrogen tank for long-term storage.
To learn more on this topic, check out our related articles on fresh vs. frozen PBMCs and how to thaw frozen cells. You can also submit questions to our scientific support team at info@cytologicsbio.com.


